


1. Sample overview
Hash: af6a9b7e7aefeb903c76417ed2b8399b73657440ad5f8b48a25cfe5e97ff868f
In this new sample, threat actor has updated Qakbot’s codebase to support 64-bit versions of Windows.


Hash: af6a9b7e7aefeb903c76417ed2b8399b73657440ad5f8b48a25cfe5e97ff868f
In this new sample, threat actor has updated Qakbot’s codebase to support 64-bit versions of Windows.
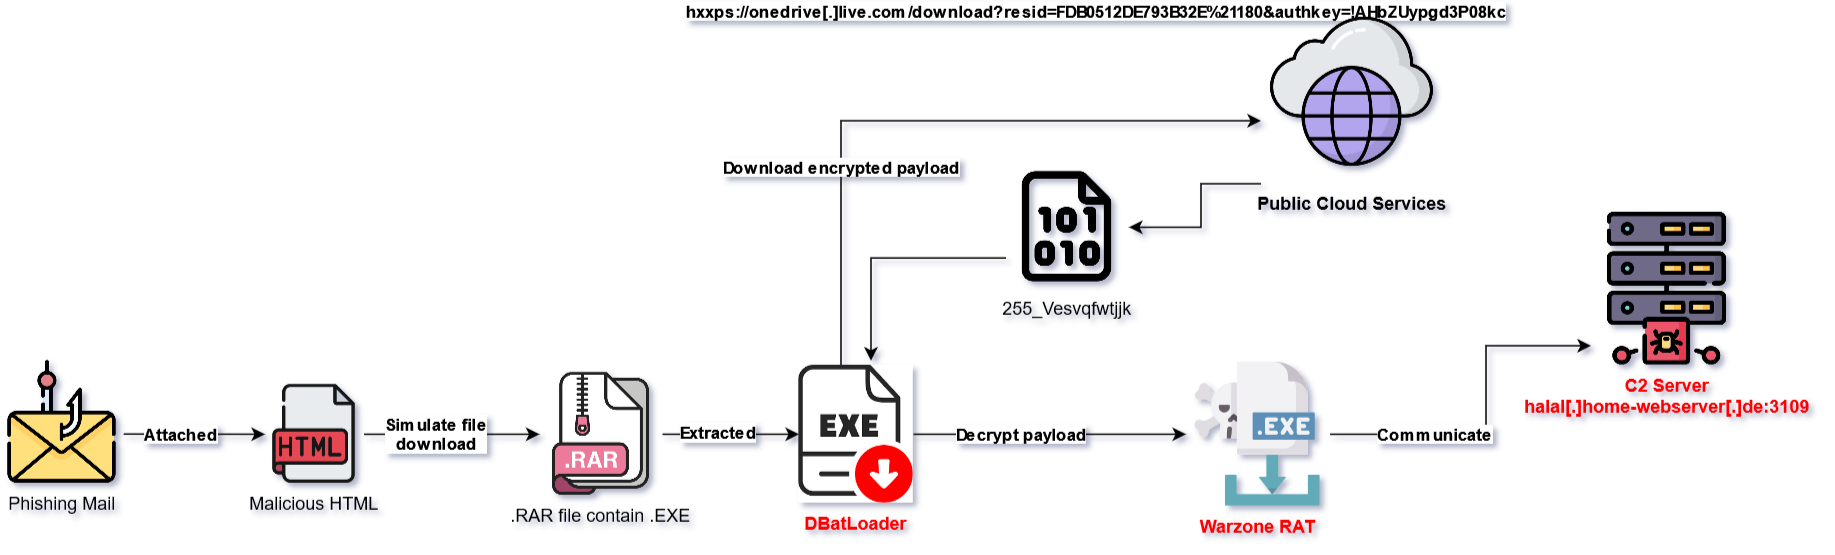
Below is an illustrated and summarized way of how WarZone RAT sample infects the victim system via DBatLoader:
In early February 2023, cybersecurity experts on Twitter issued a warning about a new malware variant/family being distributed by the #TA577 botnet (associated with the same group from #Qakbot). This malware shares similarities with the Qakbot Trojan, including distribution methods, campaigns, and behaviors. It was quickly nicknamed Pikabot.

Pikabot consists of two components: loader/injector and core module. It utilizes loader/injector to decrypt and inject the core module. Core module then performs malicious behaviors, including gathering information about the victim machine, connecting to command and control server to receive and execute arbitrary commands, downloading and injecting other malware.
Read the rest of this entry »I would like to share my presentation at the Security Bootcamp 2023 (SBC2023) event, which took place over three days from September 8th to September 10th, 2023, in Da Nang city.
2023 is the 10th anniversary of Security Bootcamp, and the second time was held in Da Nang city. The event continues its mission of building and connecting the community of cybersecurity professionals nationwide to share the latest knowledge and skills, creating a reputable and quality conference for cybersecurity in Vietnam.

The attacker sent an email with an attachment named “brochure-for-2023-elite-events.rar”. This rar file contains only one lnk (shortcut) file named: brochure-for-2023-elite-events.pdf.lnk. If the user does not pay attention and extracts the file, it will be displayed as a PDF icon like the following:

I received a suspicious Dll that needs to be analyzed. This Dll is packed. After unpacking it and throwing the Dll into IDA, IDA successfully analyzed it with over 7000 functions (including API/library function calls). Upon quickly examining at the Strings tab, I came across numerous strings in the following format:
Read the rest of this entry »Recently, I received a hash of sample from a friend on Twitter. Upon further investigation, I noticed that the code was likely created by someone in Vietnam. As a result, I decided to analyze and share it with others.
Malicious code can be incredibly dangerous and harmful to computer systems, and it’s important to be able to recognize and understand it. By analyzing the code, we can determine its purpose and potential impact, as well as develop strategies to protect against similar threats in the future.
Given the potential risks of this particular code, I felt it was important to share my findings with others in the security community. By working together and sharing information, we can all help to keep our systems and networks safe from harm. I hope that someone will take the time to investigate deeper and uncover who is behind this malware. It is crucial to identify the culprit and hold them accountable for their actions.

Warzone RAT is a type of malware that is capable of infiltrating a victim’s computer and giving attackers remote access and control over the system. The malware has gained notoriety for its advanced capabilities and ability to evade detection, making it a serious threat to computer security.
Warzone RAT is typically spread through phishing emails or other social engineering techniques, where attackers trick victims into downloading and installing the malware on their systems. Once the malware is installed, it can perform a variety of malicious actions, including stealing passwords, taking screenshots, and logging keystrokes. It can also download and execute additional malware, giving attackers even more control over the victim’s system.
One of the key features of Warzone RAT is its ability to encrypt its configuration data, making it difficult for security experts to analyze and understand how the malware operates. Currently, there are two variants of the malware in circulation, each using a different method to decode its configuration. The first variant uses standard RC4 encryption, while the second variant uses a modified version of RC4. This modification makes it even more challenging to decrypt and analyze the malware’s configuration data.
Read the rest of this entry »Sample information shared by Johann Aydinbas(@jaydinbas):

Sample hash: 2025427bba36b48e827a61116321bbe6b00d77d3fd35d552f72e052eb88948e0
Download here!
Read the rest of this entry »Recently, in my free time, I continue hunting samples related to PlugX malware of the Mustang Panda group. Among the results returned by VirusTotal, there is a file submitted to VT from LV (Latvia ??) at 2022-12-06 06:39:03 UTC:


Sample hash is: fc345d151b44639631fc6b88a979462dfba3aa5c281ee3a526c550359268c694
This write-up of mine will be divided into three parts:
Loader: https://bazaar.abuse.ch/sample/816c4a2117b90dc75d91056ca32a36ffd32d561aa433ee3f97126ba490e6d60a/
Unpacked: 7bd942857a29e7f2931da2bd8fa1d118
Here is the the pseudo-code of the function that decodes the strings:
_BYTE *__usercall vdr_decrypt_strings@<eax>(uint32_t len@<ecx>, char *xor_key, const char *encStr)
{
  // [COLLAPSED LOCAL DECLARATIONS. PRESS KEYPAD CTRL-"+" TO EXPAND]

  cnt = 0x208;
  v5 = Destination;
  do
  {
    *v5 = 0;
    v5 = (v5 + 1);
    --cnt;
  }
  while ( cnt );
  wcscat(Destination, L"Nor again is there anyone who loves or pursues or desires to obtain pain of itself, because it is pain");
  wcslen(Destination);
  wcslen(Destination);
  wcslen(Destination);
  wcslen(Destination);
  decStr = LocalAlloc(0x40u, len + 1);
  wcslen(Destination);
  wcslen(Destination);
  wcslen(Destination);
  wcslen(Destination);
  decStr[len] = 0;
  wcslen(Destination);
  wcslen(Destination);
  wcslen(Destination);
  wcslen(Destination);
  for ( i = 0; i < len; ++i )
  {
    wcslen(Destination);
    wcslen(Destination);
    decStr[i] = xor_key[i] ^ encStr[i % strlen(encStr)]; <-- xor loop
    wcslen(Destination);
    wcslen(Destination);
  }
  wcslen(Destination);
  wcslen(Destination);
  memset(Destination, 0, sizeof(Destination));
  return decStr;
}
I would like to share my talk at the Security Bootcamp 2022 event (SBC2022) held in 03 days 09-10-11/09/2022 in Quang Ninh province.
2022 is the 10th year that Security Bootcamp conference is organized to continue the mission of building and connecting information security professionals across the country to share the latest knowledge and skills to form a top quality and prestigious forum for information security in Vietnam.

CrowdStrike researchers first published info about the Mustang Panda group in June 2018, after about a year of observing the group’s attack activities. Mustang Panda, believed is a China-based cyber espionage threat actor, is considered one of the highly motivated APT groups, applying sophisticated techniques to infect and install malware, targeting gain access to the victim’s machine from which to carry out espionage activities and steal information. Mustang Panda is famous for applying infection techniques based on topics related to political events, including the COVID-19 pandemic, … According to research and synthesis from many security companies across the global, this APT group has been around for over a decade with different variations found around the world.
In the second quarter of 2022, while hunting on VirusTotal’s platform, performing a search for specific byte patterns related to the Mustang Panda (#PlugX) group, I discovered a series of samples that we suspect to be of this group was uploaded from Vietnam. Parallel to the campaign that is believed to attack Vietnam, is a series of other campaigns of this group targeting events related to the European Union, the armed conflict that took place in Ukraine, events in countries like Montenegro, Bosnia and Herzegovina,…
My talk at this conference will cover hunting process as well as analyze in-depth the techniques that the Mustang Panda group applied to infect the victim’s machine, thereby use as a springboard to conduct espionage activities and information theft.
Download my presentation here!
Regards,
m4n0w4r
Tại VinCSS, gần đây tôi có viết một bài phân tích liên quan tới các mẫu mã độc của nhóm Mustang Panda (PlugX). Các mẫu này đều được tải lên từ Việt Nam. Các bạn có thể xem nội dung tiếng Việt hoặc tiếng Anh của bài phân tích này.
Tuy nhiên, trong số các file log.dll được tải lên, có một file không liên quan tới kĩ thuật tấn công của nhóm Mustang Panda, nó được đánh dấu trong hình dưới đây:

At VinCSS, I recently wrote an analysis related to the samples of the Mustang Panda (PlugX) group. These samples are all uploaded from Vietnam. You can read the Vietnamese or English blog post of this analysis.
However, in all the uploaded log.dll files, there is one file that is not related to the Mustang Panda group’s attack technique, it is marked as the following picture:
As part of my work at Vincss, I wrote an article about Zloader – “[RE026] A Deep Dive into Zloader – the Silent Night“.
Zloader, a notorious banking trojan also known as Terdot or Zbot. This trojan was first discovered in 2016, and over time its distribution number has also continuously increased. The Zloader’s code is said to be built on the leaked source code of the famous ZeuS malware. In 2011, when source code of ZeuS was made public and since then, it has been used in various malicious code samples.
Zloader has all the standard functionality of a trojan such as being able to fetch information from browsers, stealing cookies and passwords, capturing screenshots, etc. and for making analysis difficult, it applies advanced techniques, including code obfuscation and string encryption, masking Windows APIs call. Recently, CheckPoint expert published an analysis of a Zloader distribution campaign whereby the infection exploited Microsoft’s digital signature checking process. In addition, Zloader has also recently partnered with different ransomware gangs are Ryuk and Egregor.
Read the rest of this entry »FOREWORD:
The analyzed sample is a 64-bit executable: 0c4a84b66832a08dccc42b478d9d5e1b
Read the rest of this entry »Usually, to make it more difficult for analysts, malware authors will hide important strings and only decrypt these strings during runtime. The famous malwares like Emotet, QakBot or TrickBot often use the one or some functions to perform decrypting strings when needed.
However, on researching and analyzing some other malwares such as Conti, BlackMatter and BazarLoader, instead of using a separate function to decrypt strings, these malwares make it more difficult by saving the encrypted strings on the stack as stack strings. Then, strings are decrypted by XOR-ing with a key value (this value may not be fixed) or through quite complex computation. This technique consumes time of the analyst.
Read the rest of this entry »
Recently, on the twitter of Shadow Chaser Group, they tweet information about malware sample that targeting Vietnam.

Sample info:
Bien ban thong nhat ke hoach dao tao_VPB.Voffice.docx2022-01-24 02:52:14 UTCThis article is based on samples collected by Mr. Brad Duncan through his excellent lab: 2022-01-20 (THURSDAY) – EMOTET EPOCH 4 AND EPOCH 5 INFECTIONS
The time of the initial infection in the pcap file (2022-01-20-Emotet-epoch4-infection-with-spambot-activity.pcap) is around 2022-01-20 19:37 UTC, when the victim clicks on the link in the spam mail, they will access the address mangaloresoundandlights[.]com:

If the access is successful, the victim will be asked to download an Excel file similar to the image below (this file will have a random name after each access. As in Mr. Brad Duncan’s summary, the file he downloaded has file name: 12772684608453.xls):
Qua các bài viết trước, các bạn cũng đã biết CANARY là gì rồi, nó là một giá trị ngẫu nhiên được lưu vào bộ nhớ (biến) trên Stack, ngay phía trên giá trị của EBP (old frame) và địa chỉ trở về. Vì vậy, khi thực hiện overflow để ghi đè lên địa chỉ trở về thì giá trị này cũng sẽ bị ghi đè. Lúc đó, cuối chương trình sẽ có đoạn code thực hiện kiểm tra lại giá trị của CANARY, nếu như vẫn là giá trị ban đầu đã lưu thì chương trình sẽ tiếp tục thực thi bình thường, còn ngược lại nếu là một giá trị khác giá trị ban đầu thì chương trình sẽ chặn việc thực thi mã.
Gửi kèm theo bài viết này là ví dụ CANARY_sin_DEP.exe (hay CANARY_without_DEP) do thầy Ricardo Narvaja biên soạn để tôi và các bạn thực hành. Trong phần sau, chúng ta sẽ thực hành với một ví dụ có DEP và phải xây dựng ROP để vượt qua được CANARY. Code trong hai ví dụ là giống nhau, khác nhau chỉ là ở chỗ có cơ chế Stack CANARY được thêm vào nhằm ngăn không cho nó bị khai thác bằng cách ghi đè lên địa chỉ trở về.
Ta sẽ sử dụng lại script đã viết cho file NO_DEP.exe ở phần 34 để trace code và xem tại sao script đó lại không áp dụng được với CANARY_sin_DEP.exe, từ đó cố gắng tìm hiểu cách thức để vượt qua cơ chế bảo vệ CANARY.

I saw this hash 2569cc660d2ae0102aa74c98d78bb9409ded24101a0eeec15af29d59917265f3 shared at malwareresearchgroup.slack.com. It was submitted to VT at 2021-09-01 19:47:50 and 37 security vendors flagged this file as malicious.

Refs:
RecoveryManual.html content in memory and fill %CLIENT_ID%:
 // Generate CLIENT_ID
  for ( client_id_pos = StrStrIA(psz_recovery_manual_ransom_note, "%CLIENT_ID%");
        client_id_pos;
        client_id_pos = StrStrIA(psz_recovery_manual_ransom_note, "%CLIENT_ID%") )
  {
    cnt = 32i64;
    client_id_str = g_str_879538e20b82e80052dd5f7ef9ad5077;
    // replace %CLIENT_ID% with generated client_id
    // first 32 bytes is "879538e20b82e80052dd5f7ef9ad5077"
    // and the rest 32 bytes is random value
    do
    {
      client_id_str[client_id_pos - g_str_879538e20b82e80052dd5f7ef9ad5077] = *client_id_str;
      ++client_id_str;
      --cnt;
    }
    while ( cnt );
    ptr_curr_pos = client_id_pos + 32;
    for ( j = 0i64; j < 16; ++j )
    {
      *ptr_curr_pos = str_0123456789abcdef[(unsigned __int64)(unsigned __int8)szComputerName[j] >> 4];
      ptr_next_pos = ptr_curr_pos + 1;
      ch_ = szComputerName[j];
      *ptr_next_pos = str_0123456789abcdef[ch_ & 0xF];
      ptr_curr_pos = ptr_next_pos + 1;
    }
  }
Ở phần 36 này, tôi sẽ thực hiện lại ví dụ trong phần trước nhưng sẽ sử dụng mona đã tích hợp với Windbg. Do mona không hoạt động trong IDA được nên chúng ta sẽ sử dụng WinDbg riêng mà không sử dụng tích hợp với IDA.
Từ màn hình console, tôi chạy DEP.exe kèm theo một tham số truyền vào cho chương trình, nó sẽ dừng lại và đợi thông tin chúng ta nhập vào từ bàn phím:

Ta hoàn toàn có thể thực thi chương trình từ WinDbg, mục đích đơn giản là để dừng sự thực thi ở đâu đó khi mà DLL sẽ sử dụng làm ROP được nạp vào bộ nhớ. Cũng không quan trọng ngay cả khi chương trình bị crash. Trong trường hợp này, tôi đang ở bên trong hàm gets_s() và Mypepe.dll đã được nạp vào bộ nhớ. Mở WinDbg (x86) và nhấn F6 để thực hiện Attach process:

Lời tựa: Con người là loại động vật cấp cao và cũng đầy lòng trắc ẩn. Tôi không muốn một ngày nào đó, có người còm vào blog của tôi để hỏi đại loại: “Tiền anh được donate anh đã làm gì…?“. Kiểu như bài này: https://vtc.vn/hoai-linh-chua-chuyen-13-ty-dong-keu-goi-ung-ho-mien-trung-ar613537.html. Sáng nay đọc bài báo này https://vtc.vn/bo-la-benh-nhan-covid-19-vua-qua-doi-hai-con-nho-tu-cham-nhau-trong-khu-cach-ly-ar613273.html, tôi quyết định dùng số tiền mà những bạn đã donate cho tôi để ủng hộ hai cháu nhỏ.

Tiếp tục với phần 35, chúng ta sẽ làm việc với phiên bản có DEP. Như các bạn đã biết, code của ví dụ này tương tự như ở NO_DEP. Vậy điều gì sẽ xảy ra nếu tôi sử dụng lại script đã tạo cho file không có DEP ở phần trước?
Thay đổi lại tên file trong script để trỏ tới DEP.exe.

Some information about DealPly can be found here:
The post focuses on the following main sections:
Sample:
SHA-256: 40584f79d109a18b1c4ea7e75a945324978652b6afcc9efbe62241717f0b4685
Read the rest of this entry »Năm hết, tết đến… Màn hình điện thoại vụt sáng. Mở máy thấy tài khoản mốc được + xèng kèm theo lời chúc của một bạn sinh viên đến từ KMA. Rất cảm ơn em, lâu lâu mới thấy số dư TK thay đổi 🙂 . Năm mới anh cũng chúc gia đình em mạnh khỏe, vạn sự như ý, chúc em học tập tốt và sớm tìm được công việc phù hợp trong ngành InfoSec.

Trong phần 34 này, thầy Ricardo cung cấp hai ví dụ đã được ông biên dịch sẵn, một có sử dụng DEP và một không. Hai ví dụ đều có mã nguồn giống nhau, nhưng trong trường hợp này, thay vì thay đổi thông qua trình biên dịch thì thầy đã sử dụng API SetProcessDEPPolicy trực tiếp trong code của chương trình. Một với tham số là 0 (DEP off) và một với tham số là 1 (DEP on).
Trong các phần trước, tôi đã cùng với các bạn cài đặt và chuẩn bị môi trường để làm việc giữa IDA và WinDbg. Ở phần 33 này, chúng ta sẽ bắt đầu tìm hiểu quá trình thực hiện khai thác chương trình và thực thi mã nếu có thể. Tất nhiên, để có thể làm được thì cần phải trang bị các kiến thức cơ bản liên quan đến các cơ chế giảm thiểu và bảo vệ được áp dụng trên hệ điều hành Windows, từ đó tìm các cách thức để vượt qua. Đôi khi chúng ta có thể vượt qua được và cũng có lúc là không 🙂 . Điều này hoàn toàn bình thường! Như mục tiêu ban đầu của loạt bài viết này, đó là chúng ta sẽ đi thật chậm, từng chút một bằng cách nghiên cứu chúng. Trước tiên, hãy xem xét một số định nghĩa quan trọng.
Read the rest of this entry »
Firstly: Credit to my bRother (cre4milk) for his technical review and keep me up when writing this write-up!!!!
Read the rest of this entry »
Đề bài như sau:
“Tại Reynholm Industries, chúng tôi tự hào về mọi thứ. Thật không dễ dàng để thừa nhận, nhưng gần đây một máy chủ quan trọng nhất của chúng tôi đã bị kẻ xấu kiểm soát. Chúng tôi không tin lắm vào việc giám sát máy chủ vì vậy tất cả những gì chúng tôi có là một tập tin chứa quá trình giao tiếp mạng. Chúng tôi cần bạn điều tra và xác định dữ liệu nào đã bị kẻ xấu lấy từ máy chủ này, nếu có.
Cảm ơn!“
Trong phần 32 này, chúng ta sẽ cài đặt một số plugin cho Windbg để bổ trợ trong các công việc tiếp theo. Thật không may, các plugin này chỉ hoạt động khi chạy độc lập với Windbg, còn nếu chạy chúng trong Windbg tích hợp với IDA thì có thể bị crash bởi vì nó xung đột với Python đi kèm theo IDA. Tuy nhiên, chúng ta sẽ sử dụng chúng riêng biệt với Windbg khi cần.
Ta sẽ cài đặt Pykd – python extension for WinDBG: https://githomelab.ru/pykd/pykd/wikis/home
Các bạn có thể tải Pykd-Ext tại https://githomelab.ru/pykd/pykd-ext (tại thời điểm tôi viết bài là pykd_ext_2.0.0.17.zip) và copy lần lượt vào thư mục “winext” của Windbg. Ví dụ, trên máy tôi là: C:\Program Files (x86)\Windows Kits\10\Debuggers\x86\winext và C:\Program Files (x86)\Windows Kits\10\Debuggers\x64\winext. Pykd-Ext mới chỉ là extension cho phép chạy pykd bên trong Windbg mà thôi, do đó bước tiếp theo là phải cài đặt thêm pykd.
Read the rest of this entry »Phần 31 này sẽ đề cập tới việc cài đặt Windbg để làm việc với IDA. Như các bạn đã biết (hoặc có thể chưa biết), Windbg là một trình debugger mạnh, hàng chính hãng của M$. Trình debugger nổi tiếng này có thể được quản lý từ giao diện của IDA và nó là công cụ không thể thiếu đối với những ai đang tìm hiểu hoặc làm việc trong lĩnh vực tìm kiếm và khai thác lỗ hổng phần mềm (nhưng thú thật tôi cũng ít khi dùng tới nó 😦 ). Điểm bất tiện có lẽ nằm ở giao diện sử dụng của trình debugger này, gần như tất cả các thao tác làm việc với nó đều thông qua các lệnh dạng console và khá phức tạp để nắm được cũng như sử dụng thành thạo các câu lệnh này. Với những ai đã quen dùng OllyDbg/x64dbg, khi chuyển qua dùng thử Windbg chắc đều có chung cảm giác là khó dùng.
Tuy nhiên, chúng ta có thể sử dụng giao diện debug của IDA, kết hợp với sự hỗ trợ nền bên dưới là engine của Windbg. Sự kết hợp này vô cùng hữu ích khi bạn muốn thực hiện debug kernel, hoặc sử dụng để lấy thông tin về trạng thái của heap trong trường hợp muốn khai thác các lỗi như heap overflowhoặc after free mà tôi và các bạn sẽ cùng nhau tìm hiểu ở các bài viết tiếp theo.
Read the rest of this entry »Sample hash:
SHA256: 76cd290b236b11bd18d81e75e41682208e4c0a5701ce7834a9e289ea9e06eb7e
Tools:
Thow the sample to PortEx Analyzer, tool will analyse file with a special focus on malformation. We get the results:

Challenge requirements:

Throw the sample to PortEx Analyzer, this tool analyses file and focus on malformation characteristics. I get the results:

Recently, I’ve supported a foreign friend on Twitter during the analysis one of GuLoader (or CloudEyE) variant sample. Although, he have read these articles (1, 2) but still stuck and I know that feeling.

The discussion between us was quite long, finally I sent him my quick analysis so that he can read and follow. Now, I put the analysis that we discussed on this blog hoping it will help others like him.

Trước khi đi vào nội dung chính của bài viết, tôi xin cảm ơn bạn sinh viên nào đó “cuối tháng” vẫn donate vào tài khoản của tôi! Trân trọng!! Số tiền donate mà tôi nhận được, tôi sẽ dành để làm những công việc thiện nguyện hoặc những việc mà tôi thấy có ích và có giá trị. Đơn cử như góp một phần nhỏ bé (https://www.facebook.com/permalink.php?story_fbid=10158548818576598&id=554051597) để mong cháu sẽ khoẻ mạnh bình thường, được đi học, được trưởng thành và đóng góp cho xã hội!
…. Để gió cuốn đi…..
Để giải quyết bài tập ở phần trước, tôi sẽ giải thích thêm về một số điểm có thể các bạn còn chưa rõ và sau đó chúng ta sẽ tìm cách để xây dựng một PoC. Một trong những điểm chưa rõ ràng là nhiều lúc chúng ta thường chấp nhận độ dài của mảng do IDA gợi ý cho chúng ta và đôi khi chúng ta phải tự đặt nghi vấn và tự phân tích, phán đoán như trong phần trước rồi từ đó khẳng định được mảng sẽ có giá trị lớn hơn so với giá trị mà IDA đã gợi ý.
Như vậy, rõ ràng là để làm được thì sẽ phải phụ thuộc rất nhiều vào kinh nghiệm của từng người. Ở phần này tôi sẽ cố gắng giải thích thêm thông qua một vài ví dụ cụ thể.
Hãy xem ví dụ đơn giản sau đây:

Chương trình yêu cầu nhập một số từ bàn phím và lưu vào biến size. Thực hiện kiểm tra và thoát khỏi chương trình nếu size >= 0x200. Sau đó, sử dụng một vòng lặp để đọc kí tự từ bàn phím và gán vào buffer, với số lần lặp phải thỏa mãn điều kiện (i <= size) && ((ch = getchar()) != EOF) && (ch != ‘\n’). Như vậy, có thể thấy nếu bạn nhập giá trị cho size là 10 nhưng bạn chỉ nhập vào một kí tự và nhấn enter thì buffer cũng chỉ được gán một kí tự đó mà thôi.
Read the rest of this entry »From Bruce’s talk:

As part of my work at Vincss, I wrote an article about ““Heaven’s Gate” An old technique but still effective “.

“Heaven’s Gate” is the common name of a technique that allows 32-bit binary to execute 64-bit instructions without following the standard processing flow on the environment (Windows 32-bit on Windows 64-bit) WoW64. You can read here.
Với những gì tôi và các bạn đã cùng tìm hiểu trong các phần trước thì trong phần này chúng ta sẽ thử phân tích một chương trình thực tế. Ý tưởng chính ở phần này là cung cấp cho các bạn hai phiên bản khác nhau của cùng một chương trình (Ứng dụng xem video: VLC), căn cứ vào phiên bản mới hơn các bạn áp dụng các kĩ thuật diffing để phân tích code của chương trình. Cách thực hiện diffing thì như tôi đã giới thiệu rồi, dựa vào đó các bạn cố gắng xem nếu có lỗi overflow thì sẽ xảy ở đâu, chứ không nhất thiết phải viết mã để khai thác.
Thông tin mô tả CVE của ứng dụng VLC các bạn xem tại đây. Lỗi buffer overflow xảy ra khi bạn mở một tệp có phần mở rộng là .ty trong phiên bản VLC từ 0.9.0 đến 0.9.4, từ đó cho phép kẻ tấn công có thể thực thi mã trái phép. Đây là một lỗi đã cũ, tuy nhiên mục đích của chúng ta là để tìm hiểu và học hỏi.

Như thường lệ, xen kẽ với các bài tập thực hành là những nội dung lý thuyết để giúp củng cố kiến thức cũng như hoàn thiện và nâng cao kĩ năng, từ đó có thể tìm hiểu sâu và rộng hơn. Trong phần 28 này, tôi sẽ đề cập tới một số lý thuyết về các chủ đề mà trong quá trình RE ta cần phải biết.
Khi viết code của một chương trình, các bạn chắc không lạ gì với việc khai báo/ định nghĩa một biến. Ví dụ:
int temp = 4;

Với việc khai báo biến như trên, chương trình sẽ phải dành ra một không gian đủ cho việc lưu trữ, trong trường hợp này sẽ dành ra 4 bytes ở một vị trí bộ nhớ nào đó. Sau đó, khi giá trị 4 được gán vào biến này, ta sẽ có giá trị 4 của temp được lưu tại một địa chỉ bộ nhớ do chương trình chỉ định.
Read the rest of this entry »
As part of my work at Vincss, I summed up and wrote an article about “Macro Malware Common Techniques“. You can read here.
Regards,
m4n0w4r
Phần 27 này sẽ giải quyết bài tập (IDA_STRUCT.7z – do chính thầy Ricardo Narvaja biên soạn) mà tôi đã gửi kèm ở phần trước. File nén này gồm một file thực thi là ConsoleApplication4.exe và một file pdb đi kèm là ConsoleApplication4.pdb (mục đích để các bạn kiểm tra lại sau khi đã tự reverse code).
Thông thường, khi load chương trình vào IDA, IDA sẽ kiểm tra và phát hiện ra file mà chúng ta đang phân tích có link tới symbol file và hỏi xem có muốn load file này không? Ví dụ như hình dưới đây:

Tuy nhiên, trong các tính huống thực tế thì ta sẽ không có file pdb này. Do vậy, để đúng với thực tế tôi sẽ chọn No để không load kèm file. IDA sau khi phân tích xong sẽ dừng lại tại đây:
Read the rest of this entry »Trong phần 26 này, chúng ta tiếp tục tìm hiểu thêm về struct. Hãy xem ví dụ bên dưới đây, đó là toàn bộ code của hàm main():

Trong ví dụ trên, tôi có một cấu trúc là MyStruct. Cấu trúc này được khai báo global (toàn cục) thay vì được khai báo local (cục bộ) bên trong thân hàm main(). Việc khai báo như vậy có thể cho phép khả năng xử lý tốt hơn giữa các hàm khi truyền vào biến có kiểu struct. Ta khai báo biến values có kiểu MyStruct. Đây là biến local và được khai báo trong hàm main(), như vậy biến này chỉ xuất hiện trong Stack của hàm main() mà thôi.
Cấu trúc MyStruct được định nghĩa bên ngoài hàm main() cùng với các hàm khác như trong hình dưới đây:
Read the rest of this entry »Mặt trời là cái bếp lớn, còn tia nắng là than hồng
Mỗi ngày mà ta thức dậy, ta chỉ mong được an lòng
Hoàng hôn là dải lụa, còn màn đêm là tấm chăn
Mỗi đêm ta ngồi ta viết ta chỉ mong không bị cấm ngăn
_Đen_
Trong phần tiếp theo này, chúng ta sẽ bắt đầu tìm hiểu cách mà IDA Pro hỗ trợ để reverse các chương trình có sử dụng struct. Phần cuối bài viết sẽ là những giải đáp ngắn gọn về các bài tập IDA3.exe và IDA4.exe đã gửi kèm ở phần trước.
Vậy structure là gì?
Nôm na như sau, các bạn đã biết về khái niệm một mảng (array) trong lập trình C, mảng là một tập hoặc một nhóm các phần tử (dữ liệu) có kiểu dữ liệu đồng nhất. Các phần tử của mảng được lưu tại các vùng nhớ liên tiếp. Tương tự như vậy, cấu trúc (structure) trong C cũng là một kiểu dữ liệu do người dùng định nghĩa, nhưng khác mảng, structure cho phép kết hợp các dữ liệu có kiểu khác nhau. Chi tiết hơn các bạn đọc thêm trong các tài liệu về lập trình C/C++.
Read the rest of this entry »
Bạn từng lo lắng trong số những người bạn của mình có thể đã chiếm tài khoản Facebook của bạn? Rằng máy tính của bạn hiện đang bị giữ làm con tin bởi một loại mã độc tống tiền (ransomware)? Hoặc là các tin tặc (hackers) đang chiếm giữ tài khoản ngân hàng của bạn?
Bài hướng dẫn này được ví như là một cuốn cẩm nang dành cho những người sử dụng thông thường, nó sẽ giải thích một cách dễ hiểu nhất cho các bạn cách làm thế nào để bảo vệ mình khỏi các hacker. Các hướng dẫn này được xây dựng dưới sự giúp đỡ của 6 hacker chuyên nghiệp (thông tin của họ được nêu ở phần đầu bài viết).
Tài liệu này không đảm bảo bạn sẽ an toàn một cách tuyệt đối. Điều đó không tồn tại với môi trường Internet. Tuy nhiên, bằng cách áp dụng các mẹo trong bài viết này, bạn có thể khiến cho các hacker và virus gặp khó khăn hơn rất nhiều khi có ý định chọn bạn làm mục tiêu tấn công.
Trước khi chúng ta bắt đầu: các bạn đừng cảm thấy lo sợ khi ngồi trước máy tính của mình. Cơ hội để các hacker nhắm mục tiêu vào bạn thực sự là rất nhỏ. Hầu hết các mối nguy hiểm đều xuất phát từ thực tế là nhiều người dùng thiếu kiến thức chung về internet và máy tính, nơi mà từ đó bạn có thể bị khai thác. Vì vậy, hãy kiện toàn chính mình bằng các thông tin quan trọng nhất được đề cập trong bài viết này.
Download toàn bộ hướng dẫn tại đây:
Link: https://mega.nz/#!7C5yWKgJ!1LdSSipfBr5jE15ty_E0AO2W_rNwYAi9yP4XUiC91Qk
Regards,
m4n0w4r
Phần 24 này tôi sẽ thực hành với file IDA2.exe đã gửi kèm ở phần trước. Cách làm với IDA2.exe cũng tương tự như cách đã thực hiện với file IDA1.exe, chỉ khác là trong file này có hai biến cần kiểm tra điều kiện, nếu thỏa mãn cả hai thì chúng ta sẽ tới được đoạn code hiển thị thông báo “you are a winnner man je\n”:

Như trên hình ta thấy biến var_14 được so sánh với giá trị 0x71727374h còn biến var_C được so sánh với giá trị 0x91929394, do đó ta phải tìm cách để có thể thay đổi giá trị các biến này. Trước tiên, tôi sẽ đổi tên chúng thành cookie và cookie_2 để dễ dàng nhận biết trong code của chương trình:
Read the rest of this entry »Trong phần 23 này tôi sẽ giải quyết câu hỏi đặt ra đối với file IDA1.exe đã được gửi kèm trong phần 22. Đầu tiên, load file vào IDA để phân tích, ta sẽ dừng lại tại hàm main():

Tại đây, bạn cuộn chuột xuống dưới sẽ nhìn thấy chuỗi “you are a winnner man je\n“. Đó chính là nơi mà chúng ta cần phải tới được. Tôi đổi màu cho block này để tiện cho việc nhận diện một cách dễ dàng.
Read the rest of this entry »


